

To edit a photo with AI, upload it to an AI photo editor, pick the tool or model for the job, and describe the change in one plain sentence that also says what must stay the same, for example: "Remove the people from the bridge and fill in the stones naturally. Keep everything else the same." Check the result at full size, then chain the next edit on top or upscale the keeper. That is the whole method; the rest of this guide is about doing each step well.
Everything below was checked on 2 November 2026. Model names and credit prices come from Kenerate AI's own Edit Studio, and the before-and-after examples are real edits we already made, labelled with the model that made them. If you want a roundup of tools rather than a method, see our free AI image editor comparison; this post is the how-to.
Can you really edit photos with AI?
Yes. Modern image models do two kinds of edits:
- Prompt edits. You upload a photo and type what to change. The model redraws the image with your change and keeps the rest. This covers backgrounds, outfits, relighting, style changes, adding objects and fixing text.
- Mask edits. You brush over an area, and the model only repaints inside it. This is better for removing a stranger, a power line or a logo, because nothing outside the brushed area can drift.
Single-purpose tools (background removal, upscaling, expanding the frame, changing the camera angle) sit next to these and need no prompt at all.
What AI editing is not: a pixel-perfect retouch. A prompt edit regenerates the image, so small details such as a ring, a logo or the exact crop can change. Good prompts and a quick side-by-side check catch most of that.
Which AI can edit a photo?
Most current image models can edit, not just generate. As of 2 November 2026, Kenerate's Edit Studio offers these models for prompt edits (from edit-models.ts, priced per edit with one input photo):
| Model | Best for | Credits per edit (1 photo) | Max input images |
|---|---|---|---|
| Qwen Image 3.0 | Everyday edits; default for AI Edit, relight and recolour | 9.9 | 3 |
| Seedream 5.0 Pro | Brushed region edits and object removal (default for Magic Eraser) | 13.5 | 10 |
| Seedream 5.0 Flash | Cheap fast drafts | 8.1 | 10 |
| GPT Image 2 | Editing text inside images (default for Edit Text in Image) | 21 | 16 |
| GPT Image 2.5 Sunburst | Precise edits, posters, people | 11.7 | 16 |
| Nano Banana 2.1 | Keeping a face or product identical across several edits | 21 | 14 |
| Nano Banana 2 Fast | Expanding the frame (default for Crop & Expand) | 8 | 14 |
| Wan 2.7 | Low-cost general edits | 9 | 9 |
The no-prompt tools are cheaper: Remove Background costs 1.2 credits, the Image Upscaler 3 credits (2K, 4K or 8K), Camera Angle 7.5 and AI Background 12. At the $15 pack price of 1,300 credits, one credit is about 1.15 cents, so a 9.9-credit edit costs roughly 11 cents.
On a phone you also have built-in options. Apple's Photos app has Clean Up for removing objects, and Apple's requirements page lists iPhone 16 models, iPhone 15 Pro and iPhone 15 Pro Max on iOS 18.1 or later. It removes things; it does not take prompts like "make it golden hour".
How do you edit a photo with AI, step by step?
Here is the full workflow in Kenerate's AI image editor. The same logic works in any prompt-based editor.
- Start from the best original you have. Use the largest, sharpest file. AI can fix a lot, but it guesses less when it has more pixels to work from. Keep the untouched original so you can always go back.
- Pick the tool that matches the job. AI Edit for prompt changes; Magic Eraser or Change Region when only one area should change; Crop & Expand to widen the frame; Change Lighting for relighting; Remove BG or AI Background for cut-outs and new scenes; Edit Text in Image for signs and labels.
- Pick the model. The default is a sensible start. Switch to Nano Banana 2.1 when a face or product must stay identical across several edits, or to GPT Image 2 for text.
- Write the prompt in three parts: the change, what stays, and how it blends (the formula below).
- Generate and compare at 100%. Look at faces, hands, edges, text and anything that was supposed to stay. If something drifted, add it to the "keep" part of the prompt and run it again.
- Chain edits, one at a time. Background first, then lighting, then the outfit. One change per prompt is easier for the model and easier for you to judge.
- Finish with the Image Upscaler if you need print or 4K size, then download.
What is the best prompt formula for AI photo edits?
Google's Gemini API image guide suggests a template for targeted edits: use the provided image, change only a specific element, and keep everything else exactly the same, preserving style, lighting and composition. We use the same three parts on every model:
- The change: concrete, not vague. "A tailored navy suit with a white shirt", not "something formal".
- What stays: name the face, hair, pose, background, framing and light.
- How it blends: "match the light", "same perspective and shadows", "fill in naturally".
Google's own Nano Banana tips also recommend short, conversational instructions and iterating over several turns, which is the chaining step above.
What do real AI photo edits look like?
These three are real edits made with Nano Banana 2.1 at 1K, first published in our Nano Banana photo-editing prompts post. The prompts are the exact ones we used.
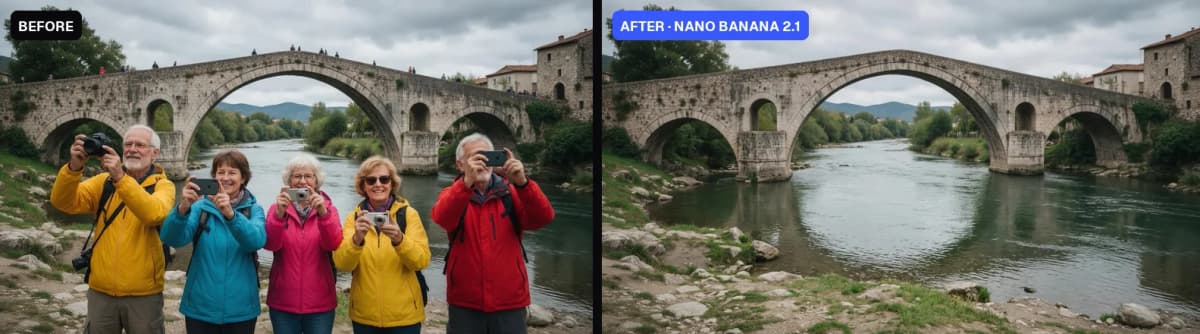
Real edit, Nano Banana 2.1. Prompt: "Remove all the people from the bridge and fill in the stones naturally. Keep everything else the same."

Real edit, Nano Banana 2.1. Prompt: "Relight the scene to golden hour at sunset: warm low sun, long shadows, glowing windows, orange sky. Keep the house and pool exactly the same."
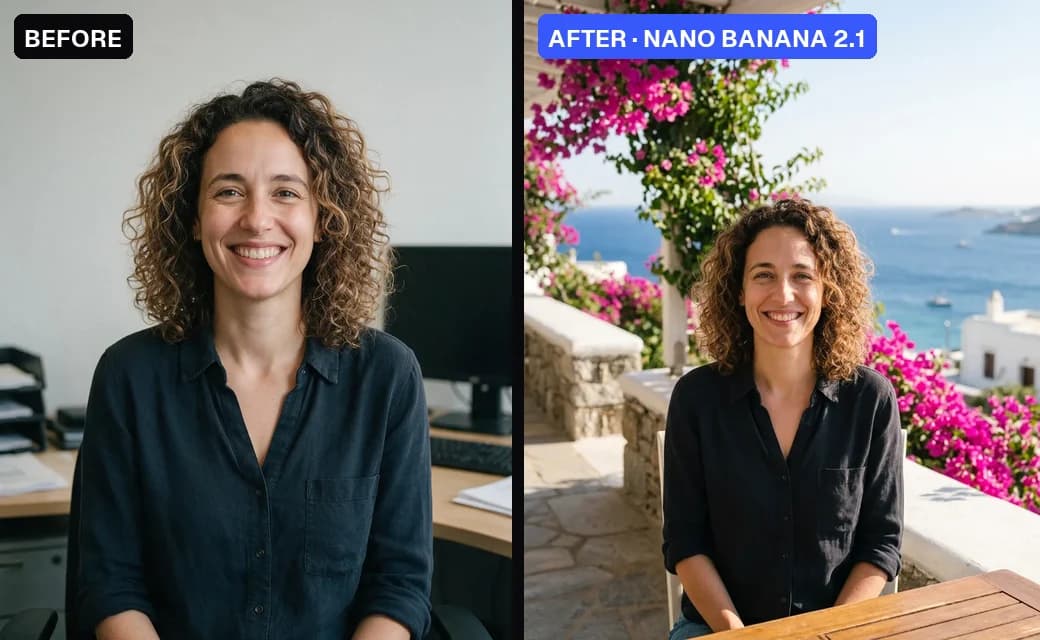
Real edit, Nano Banana 2.1. The "before" image was itself generated with Seedream 5.0 Pro so we could publish it. Prompt: "Replace the background with a sunny Mediterranean terrace with bougainvillea and the sea behind her. Keep her face, hair and pose unchanged and match the light."
What we saw: relighting was the safest edit, because nothing new had to be invented. The background swap kept the face and hair but reframed the shot a little wider, which is why "keep the original framing and crop" is worth adding when the crop matters.
Which prompts work for the most common edits?
Copy these and swap in your own details. Each one follows the change / keep / blend pattern.
| Edit | Tool to use | Example prompt |
|---|---|---|
| Remove an object | Magic Eraser (brush it) | "Remove the marked object and fill the area so it matches the surrounding wall and floor." |
| Change the background | AI Edit | "Replace the background with a clean light-grey studio backdrop. Keep the person, their edges and hair exactly the same." |
| Relight | Change Lighting | "Add soft window light from the left onto her face. Do not change the face or the background." |
| Change an outfit | AI Edit | "Change his jacket to a dark green wool overcoat. Keep his face, pose and the street the same." |
| Recolour | Color Palette / AI Edit | "Change the dress from red to emerald green. Keep the fabric folds, her face and the background unchanged." |
| Fix text | Edit Text in Image | "Change the sign text to 'OPEN DAILY'. Keep the font, colour and perspective." |
| Expand the frame | Crop & Expand | Pick 16:9 and add: "Extend the beach and sky naturally on both sides." |
| Change the style | Style Transfer | "Turn this photo into a watercolour illustration. Keep the composition and the people." |
For the dedicated jobs there are one-click pages too: remove text from an image, relight a photo and expand an image.
How do you edit photos with AI for free?
There are three honest routes, as of 2 November 2026:
- Your phone's own tools. Apple Photos Clean Up (on the supported iPhones listed above) removes objects at no extra cost. It is limited to removal.
- Free credits. New Kenerate accounts get 25 free credits, and Qwen Image 3.0, the default AI Edit model, is one of the models open to free accounts. At 9.9 credits per one-photo edit, that is two full prompt edits, or many more background removals at 1.2 credits each.
- Free tiers elsewhere. Many editors offer a handful of free edits per day or month and then ask you to pay; check the limit before you start a big batch.
What you will not find is unlimited, high-quality AI editing for free with no account. Every edit runs on a GPU somewhere, so the free part is always capped.
How do you edit photos with AI on an iPhone?
Two ways. For removing objects, open the photo in Photos, tap Edit and use Clean Up: brush or circle what you want gone, and Apple fills it in on the device (requirements on Apple's page linked above). For anything else (backgrounds, outfits, relighting, text, expanding), use a browser-based editor: kenerateai.com works in Safari, so you upload from your camera roll, edit, and save the result back to Photos.
What mistakes should you avoid?
- Several changes in one prompt. "New background, new outfit, golden hour and remove the car" invites drift. Do four edits.
- Forgetting the "keep" list. If you do not say "keep her face and the crop", the model may improve them for you.
- Judging at thumbnail size. Hands, jewellery and text only show problems at 100%.
- Editing a tiny file. Upscale a small original first, edit second.
- Editing photos of other people without permission. Only edit photos you have the right to change, and never use AI to make misleading images of real people.
- Re-editing a re-edit too many times. Each pass regenerates the image; after several rounds, fine texture can soften. Go back to an earlier version if it does.
Which tool should you pick for your edit?
- One object to remove: Magic Eraser with Seedream 5.0 Pro, or Clean Up on a supported iPhone.
- Prompt edits on a budget: Qwen Image 3.0 at 9.9 credits, or Seedream 5.0 Flash at 8.1.
- The same person across many edits: Nano Banana 2.1 at 21 credits.
- Text on signs, packaging or posters: GPT Image 2 at 21 credits.
- Bigger frame for a banner or story: Crop & Expand with Nano Banana 2 Fast at 8 credits.
- Final print size: Image Upscaler at 3 credits.
Start with one photo and one change in the AI image editor, and build from there.